Saturday, 13 April 2013

Dress Samples

Before i printed my dress i made a few colour swatches to print to see what the material was like on silk viscose and also to see how the colour was printed to decide which to go with for my final dress :)


Swatches Printing on the Mimaki printer


Final swatches cut out and washed and ironed. The mimaki has two colour programmes one which is darker than the other so we printed too, one on the dark profile which are all the top swatches and one on the light profile which are the bottom, we thought the dark profile swatches where too dark so when we print it will be on the light profile.

My personal favourites are the two grey colours, the light green and also the dark green :)

Freebies For New Designers

Yesterday i bought 50 plain key rings and printed my logo and some designs to hand out as freebies at New Designers :) 


Tuesday, 9 April 2013

Sorting out my collections of scarves

After choosing my final scarves out of each collections i have made a few amendments and also tried them in different colour ways, from my first collection i have chosen two designs that i am going to print which is these two, and here i have provided a range of different colour ways to see which work best.


This is my two final designs for my first collection and a variety of different colour ways so all i need to do is choose which two work well together as a collection.

From my second collection i felt these designs where not as stong as my other designs, i have been experimenting to try develop them but i decided to make amendments to my third collection and split it into two collection so my two final designs for my second collection are now these two..
First Design in different colour ways
My second design for second collection in different colour ways

My Third Collection
Which i like the colours of and think they work well together so leaving them as they are.

Possibly a fourth collection with these two designs but not sure yet :)..

A few additional designs that i have done that are not in a collection but could be developed...


Monday, 8 April 2013

Scarf Designs

I have created a few different designs for my three scarf collections, and i will be printing two from each collection i tried to have a few in each collection to show different ideas, development and design structure to show variety in scale, colour and design structure.

My first Collection i have four to choose from
I do like all of these designs but my two favourite are the two middle ones as i think they compliment each other and work well as a collection.

My second collection i have six to choose from

Im not too sure which ones i like best in this collection, definitely the fourth one is one of the strongest and i like the 5th and 6th as i feel these are very different styles to my other designs.

and my last collection i also have four more designs
I really like all of these designs but the first and last being my favourite and strongest yet in my opinion i cant wait to see what some of these designs look like printed :)

Let me know what you think 


Pattern For Dress

This week i have spent a lot of time trying to make my pattern pieces in illustrator so they are the correct size. So then i could place my pattern into the pattern pieces ready to print and make :) 

Here is one of my designs for my dress which i like but i do plan to do a second design if i have time just to compare and develop however i am running out of time! This is the dress it will be like.. 


I wanted to have a border around the bottom and my pattern working up and the top being plain.. so this is what i have produced so far 
These are the pattern pieces to create the top
This is the front of the dress, as you can see I've shown the centre front and the two side panels
As i didn't want all my bugs to be the same size or similar i had to spread a bug across too panels which was difficult to piece together in photoshop as i had to match them up correctly whilst thinking about seam allowance, and shrinkage for the fabric once printed. Here is a screen shot of how i did it..

As you can see this one was not matching but you can get the idea of how difficult it was and how long it took me haha
Got there in the end after about 10 attempts :)


And this is the back of my dress design i love that there is so much going on and little details that you cant quite make out but once you look further you can see little insects and winding flowers.

Please let me know what you think :)


Bradford Textile Society

I am so pleased to find out yesterday that i came third for the bradford textile society competition! I was so made up and it give me a real boost to carry on and produce great work!! Woohooooooo =D

 My Winning Entry :)

Wednesday, 3 April 2013

Mock Up Toile

The past two days i have been working on my toile dress, to see how it looks and how it is to make, i set my self a target of one and a half days which i'm glad to say i stuck to! it wasn't a difficult dress to make and with my previous skills from my college corse i was quite quick in making it.
I made it from a light green silk fabric as i intent to make my final piece from silk so i wanted to see what the fabric was like to work with when making the dress and also the weight of the dress as i plan to embellish onto it.

I started by cutting out my pattern from the Vogue pattern i had bought... Then my dog decided to run in all over it and ripped it to bits... great start!.. was it a sign?.. haha!
So i started by patching this up with masking tape thanks to buster!.. anyway once i had cut my pattern out i laid the pattern pieces on my dress to cut out and folded the fabric as i needed most things twice.
There was another long panel on a separate fabric piece as it wouldn't fit along side this with the grain of the fabric running in the right direction.. but you get the idea :)
So then i started to piece each part together on my sewing machine.. which isn't very good so i was quite brave in my opinion to attempt my dress haha!..
I started with the top part of the dress.. the pattern and dress its self is lined and got boning and interfacing in to keep it in the right position for the top but for what i'm using it for it didn't need all that so i just used a light weight interfacing to stiffen it up a little
and tad darrr!!.. i had this complete before dinner which i was chuffed about as this is the most difficult part of the dress.. the rest is just long flowing panels which wouldn't take long at all to put together. As this top would usually be lined instead i just made two top pieces and sewn them together so we had lining on the reverse so i could give the top part a nice finished seam.
Seeing how my leather top idea worked with the dress (Not finished obviously)


I then attached all the panels together and then attached it to the top part of the dress, i was amazed at how well and quick  i had put it together since not doing it for a long time - all i had left to do was the hem and the zip which i planned to do the next day.

As the weight of the silk is quite heavy the dress did not puff out at the bottom as much as i intended it too as shown on the patten of the dress i bought..
And i haven't included the bow and the straps.. however i now began to think of how i can puff the skirt out with a way that will work for my final show as i didn't intent to show it on a mannequin. 

Day 2..

Today i have had a trip to town and bought an underskirt to see how this would work under my dress
 i bought this to see if it would work, it would sit on the mannequin but i don't know how id do it with no mannequin as i don't really want to attach it to the dress and this is how it looked..

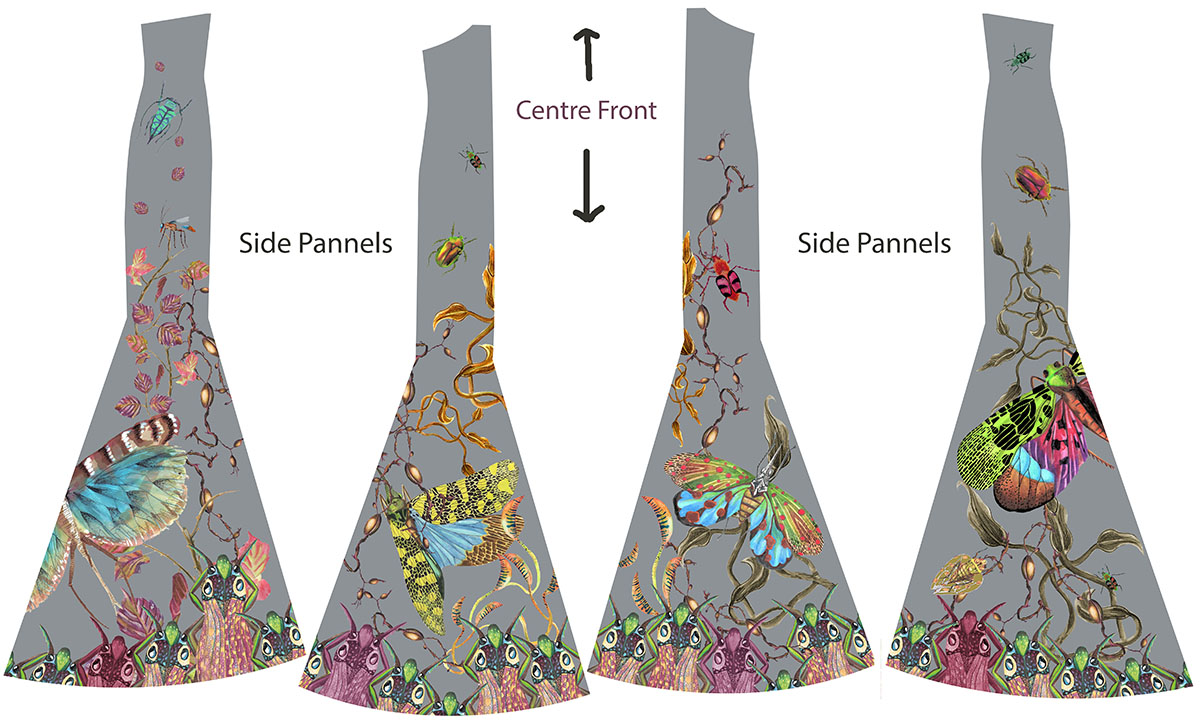
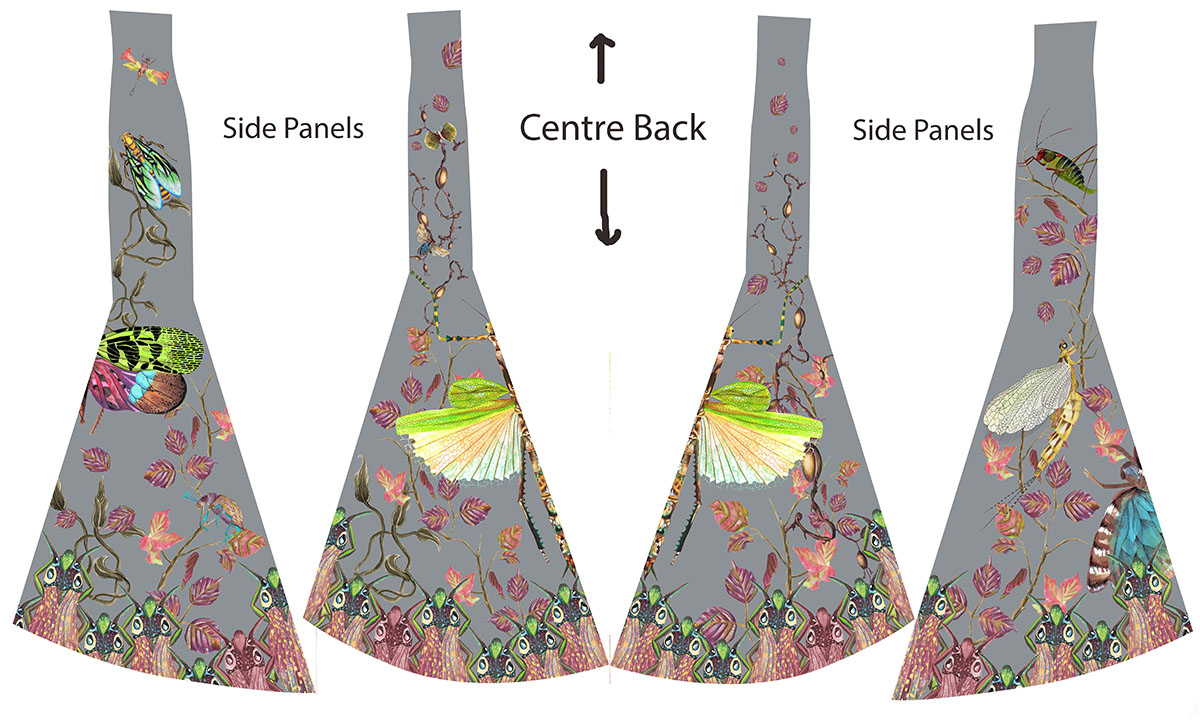
Over all I'm quite pleased with everything about the dress and i now know how long it will take for me to put together. It still needs the hem doing and a good iron :) i was even thinking i could use this as a final piece and bondiner some of my bugs and flowers onto it and embellish it that way but we will see, my other option is to make the pattern pieces to size in illustrator and place my pattern into them and have them printed.

Hope you like it!